Pages

Classroom & Showbie & Seesaw...Oh My

Classroom & Showbie & Seesaw...Oh My 


Last week our reading coach walked into my room and was admiring my white board. I began explaining to her that it was a task to stay organized with 5 classes---especially with technology. 

I am a little type A (some days I am type A+).  Staying organized while teaching 90+ kiddos is a challenge.  Here is a glimpse into how my type A self organizes the use of technology in my classroom.

This is my Code Board.  Flashcards by NKO, Google Classroom, and Showbie all require a class code.  I have color coded my board so that the kids (and I) can quickly find the code if we need it. 
These are all a 1 time log in -- but we all know that things happen and kids will need the log in code again. 


Close up of my Flashcards Codes---this was the day we downloaded the app.  I wrote outside of the chart so it was easier to see them. 


Close up of my color coded Classroom and Showbie codes  (this was before we added the Flashcards app)


I also use Socrative for digital assessments.  The code is the same for all my classes.  


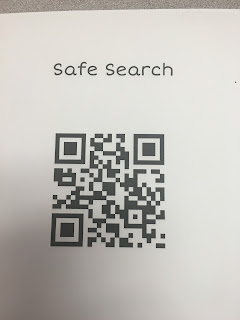
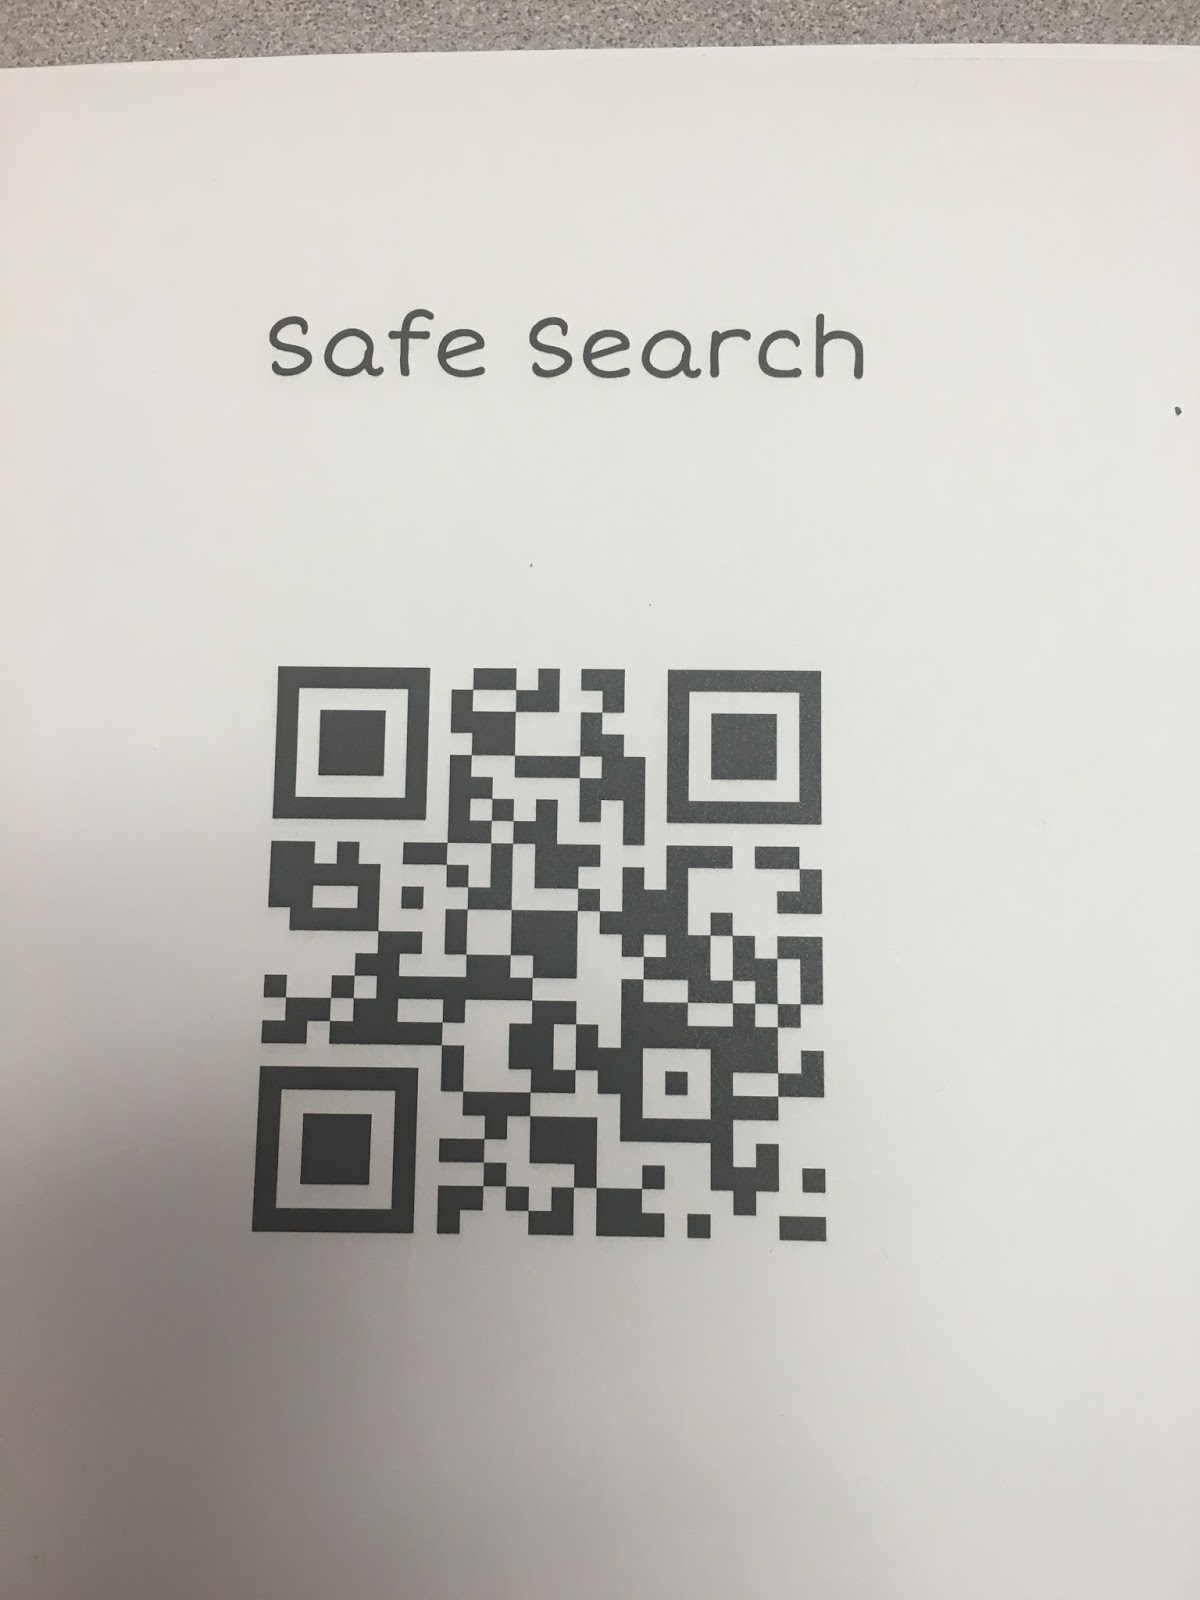
QR codes make my life so much easier.   Kids can scan and go.   I love the website http://www.safesearchkids.com/.   Safe search images make me happy. Any time we need an image or some research I whip out these QR codes.


And this one is for Kahoot!  All they have to do is scan and add the game code.  (Of course I just found out that there is a new Kahoot app so we will be downloading it soon.)
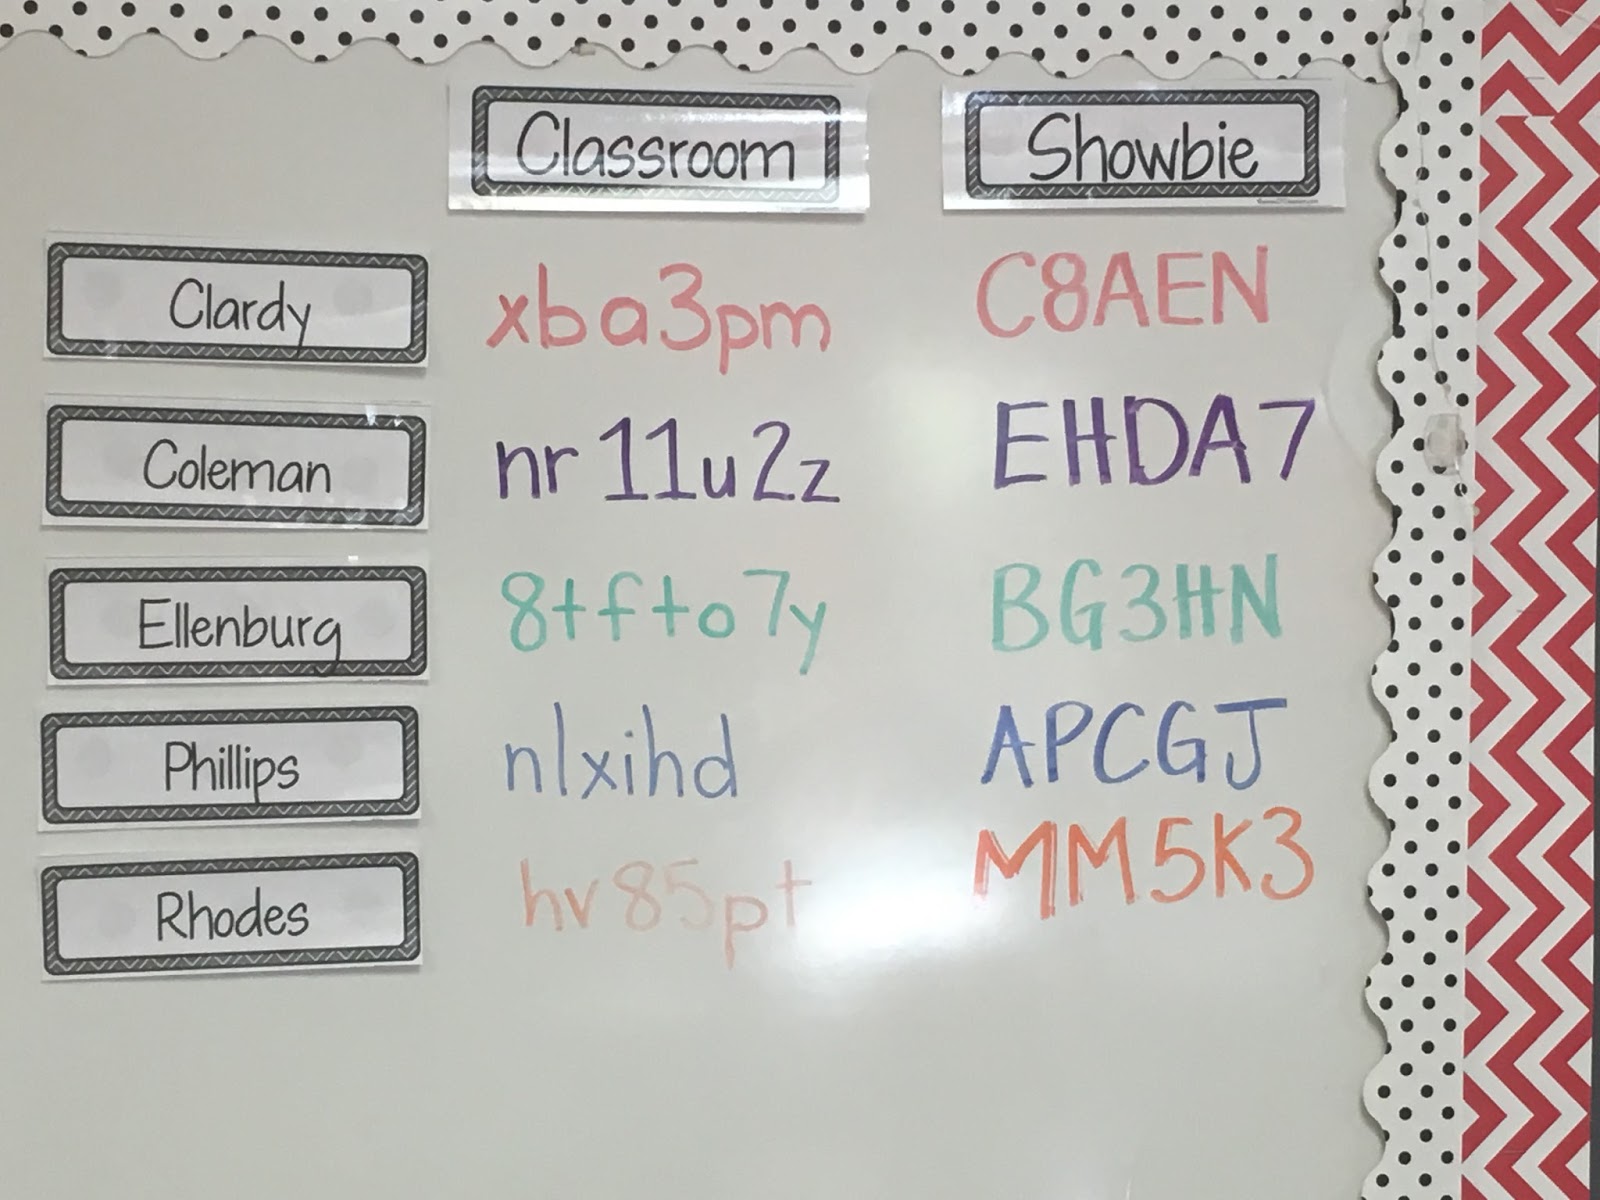

Last but not least, our Seesaw codes.   Again kiddos will inevitably log out of Seesaw or delete the app.  A quick scan from the wall and they are ready to go again. 


 I would love to hear about how you stay organized with technology in your classroom.

Hope


These 2 Divas are presenting at SC EdTech.  We would love to see you at our session on flipping professional development classes.  

0

All about those {Creation} Apps

It is September!!! Time for all things fall, which, I am usually in denial about because I LOVE summer. But here I am, on Labor Day, indulging in Pumpkin Spice Coffee & an Apple + Pumpkin candle... 

   
App Introduction:
Now that September is here and most of us are through the first few weeks of school and our routines + procedures are falling into place {hopefully smoothly}, I wanted to share a couple of my favorite apps that I use in my classroom. 
I introduced iPads on the second week of school, and we have been exploring apps each day. I have a rule that I follow in my classroom when it comes to introducing apps, TAKE IT SLOW! I don't know about you, but when I am bombarded with lots of new things at one time, my brain goes into overload mode,which turns into stress, that equals not wanting to explore technology. Do yourself a favor and introduce one app {activity} at a time. I introduce and master one app at a time with my class, and I walk my students through the "ins & outs" of how the app works. Example... How to get started, how to use the features within the app, and {possibly the most important} how to export or save anything that was created in the app. 
This past week I introduced Pic Collage to my class, I showed them how to use the features and I also paired students together so that those who were familiar could help as well. After we reviewed the app, I had them do a simple assignment, which was to take a selfie and describe themselves. 
{Is this not the cutest?}
App Spotlight: 
{All of the activities featured below are from last year, I'm not this far along yet with my current class}

 I could probably write a thesis on all of the apps that I use in my classroom, so I'll just focus on the creation + sharing apps that I use. So here is my favorite line up:
Popplet
Pic Collage


Popplet gives students the opportunity to create a web map/ flow chart/ bubble map/ with any subject! 
Students can use the app to do word sorts in Word Study:
A reading response in Guided Reading or Reader's Workshop:

Pic Collage can also be used in a variety of ways! I have used it for identifying nouns, describing nouns using adjectives, book reviews, math activities, and the list goes on. The app is simple and user friendly and students LOVE the graphics, backgrounds, and different fonts {disclaimer- if you do not want cursive, squiggly fonts, tell your students to only use the simple ones}. 


SeeSaw is probably by far my FAVORITE app! There are so many different ways you can use it in your classroom. For sake of length on this post, I'll only share a few {be on the lookout for a post dedicated to SeeSaw soon}. 
SeeSaw is a learning journal that allows you to connect parents and upload work {both digital and photos of hands on/written} into individual student portfolios. You have options that allow you to control what students upload, approve comments from parents or other students. The portfolio also has several options for uploading work. They can submit a photo, take a photo, record a video, and actually use feature to draw and submit. SeeSaw is the most versatile app that I use and both students and parents RAVE about it! Oh, and it is FREE {there is a paid version, but the free works great}.
If you have never heard about it, go explore at http://web.seesaw.me , you will LOVE it! 


I hope September is a month filled with wonderful things in your classroom! Remember this if you are introducing Apps, Keep it Simple + Take it Slow. You'll thank yourself later! If things don't go well the first time, take a step back and try again! Technology is a great tool if it is integrated and introduced correctly! If you front load apps and take time to model and let students explore, your life will be so much easier! Master 1 app at a time!


Syd

P.S. SC friends, Hope + I are presenting at SC EdTech in November! We will be talking about how we flipped our Technology PLC at our school! We would love to see you there! http://edtech.scaet.org

0

I Teach STEM

STEM....
Science Technology Engineering Math
She Teaches Excited Munchkins
Some Times Everything Miraculously {works}
Some Times Even Mrs.Meares {wants to cry}


S.T.E.M -- these 4 little letters have so much meaning.  I teach S.T.E.M. 

For the past 3 years I have had the privilege to teach STEM to 3rd graders at P.E.S.  I am very fortunate to be have the opportunity to teach science standards in a project based environment. Last year, PES became the first Project Lead the Way Launch school in ASD1.  I have fallen in love with this program and the modules.  My kiddos absolutely loved the 2 modules we completed last year and I am super excited that I get to teach 4 modules this year. 


To say that my classroom is extraordinary is probably true.  We have driven Sphero robotic balls all over the building.  We have programmed Legos to move using Lego We Do technology. We have designed shoes for extreme habitats. We have created solutions to forgetting the cooler and needing to keep Popsicles frozen.  I may or may not have worn the paper chains that my classes created as a boa/scarf. But the most important thing we have learned is to think.  To think hard.  To think about more than one solution. To think again when our first idea didn't work.  


{One of the many posters that hangs on my wall}


Project Based Learning and STEM is not for the faint of heart.  My room is a disaster some days. 5 classes worth of projects in progress are scattered about.  I have been to know to sweep as students are working because my room looks like a tornado has blow through. Students are scattered about. No one is doing the same thing at the same time.  Organized chaos at its finest.   And I am somewhere in the room---I will never forget the time last year when Mr. E, our AP, walked in {unknown to me} and said "Where is Mrs. Meares?"  One kiddo replies "Over there somewhere with that group."  Yep,  I was in the floor with my glue gun helping a group :)


Helping students understand that mistakes happen and not everything works the first time is the hardest part of my job.  Teaching students to think for themselves is such a shift in how teachers do things. Students are used to teachers giving them new knowledge. {There is nothing wrong with this.  We must teach students new knowledge}  My focus and way of teaching has changed-- I have learned to step back and not give all the answers.  My job is no longer instructor; I am the facilitator.   I provide you with the tools and the knowledge to figure out the solution to the problem on your own.  {This is not an easy task.  Tears have been shed--by me and them}


Without a doubt I can say that I have found my passion {again} in education.  
I LOVE MY JOB!!!


Last week I was honored to be on Fox Carolina as they highlighted new programs in ASD1.  I am so excited about the future of STEM education at PES.  Here is the link...


One new thing I am super excited about this year is bringing more reading into my classroom.  Here is a glimpse at the new STEM books that I just received.  I am sure there will be some future blog posts about these amazing books. 


Make this week Super, Terrific, Extraordinary, & Magnificent. 
Hope


P.S. Syd and I are presenting at SC Ed Tech in Nov.  We would love to see our fellow teachers at our session on how we transformed our tech PD.    #jointhemoovement 


0

Welcome to 2nd Grade!

 {warning- pretty lengthy post ahead}

 If I had to choose one word to describe the first two days of school, it would have to be EPIC! I haven't decided if it is the fact that almost 5 years of teaching experience has finally kicked in or that second graders are just this awesome? I'll just say it is a combination of both! I am loving second grade so far, my class is simply the sweetest! I wanted share some snap shots of my room, my goal this year was to keep it simple {I have a tendency to go overboard with decor and make it too busy for little people}. 
So here we go! 

I found this agenda during {one of my many} trips to Marshall's this summer. It sparked my imagination and I began to envision a classroom that was more modern, simple, and had somewhat of a coffee shop atmosphere {I told y'all I was addicted to coffee in an earlier post}.
I decided to go with a black and gold/ some mint and coral theme with arrows and gold dots, you know, if it sparkled, it fit in... 
My writing area is probably one of my top favorite areas in my classroom! I just love the ideas that will become amazing pieces from my oh so creative bunch of 2nd graders! I found the glitter/gold lights at Marshall's {maybe on trip #2 LOL} and fell in LOVE! The anchor charts are ones that I made a couple of years ago, laminated, and use a key components of my writing center. The caddie has markers, pencils, and idea cubes that will all be used during our literacy stations. 
My math focus area is next on the list. The clock is a chalkboard and was scored along with two others in the target dollar spot in Mt. Pleasant, can you say YES!? I plan to use this area for anchor charts {I have to move some things around}. The blue cart {staples last year} has math games, math manipulative, and math books for students to use during guided math. 
My guided reading/small group areas is:
1. the most organized it has ever been
2. has so many spots for anchor charts & skill posters!!
I found the white stools on www.ikea.com for $5 each! {Even Mr. W went for that deal!}. They make the area look so neat. Hard to see, but my clear with gold polka dots teacher chair came from Home Goods. FYI, if you have never been, mentally prepare your self! I went for the first time and could have bought everything in the store....  
I plan to use the wall space behind my table that is framed out with black border for guided reading anchor charts.

The reading center is simple. Leveled baskets + genre/topic baskets will hopefully = really excited and engaged readers. The basket labels came from Maria Gavin {@kindercraze on instagram} and fit perfectly inside the clear basket label holders that I found in Target's dollar spot. 

I used giant washi tape from Hobby Lobby to spruce up the sides of these bookcases! It is pretty amazing and so easy to put on!

The rest of the room was pretty easy! My gold arrow & gold polka border and calendar set came from Mardel.com 


So I thought my classroom door was pretty awesome.... Then my neighbor had this really cool, super awesome vinyl added to her door, #sheisAWESOME!
My door {not so cool}
Her door {#BESTEver} + you can dry erase write on it.... 

I couldn't do a "Welcome to 2nd Grade" without featuring my awesome second graders! We did a team building activity, which involved everyone {17 + me} fitting inside of a taped off 4x4 box on the floor. They accomplished it without one cross word! Proud teacher moment! 


Be on the lookout for upcoming blog posts on iPad activities at the beginning of the year, and center {literacy + math} ideas for the iPad! I hope y'all have a wonderful school year! Make it the best yet! You have 180 days to make a difference, a difference that will last a lifetime! 

Syd

P.S.  Hope & I will be presenting at SC EdTECH this year, if you live in SC, we would love to see you there! { http://edtech.scaet.org} 


0

Teacher Info Cards


Business cards---every professional lawyer, real estate agent, banker, etc, etc have them.  
Why don't teachers carry business cards?  

Several years ago, I ordered a set of business cards with my contact information on them from VistaPrint.  They were having a sale and I ordered a box.  I gave these out to parents on Meet the Teacher night. 

I was just too busy this summer   {sitting by the pool most afternoons}    and didn't order new business cards for myself.  
I was doing a little end of the summer PD   {searching for techie ideas on Pinterest}   while watching the Olympics tonight. And... I found the Most Amazing Thing.   

Free, Editable Teacher info cards from Student Savvy on Teachers Pay Teachers.


Free Teacher Information Cards! Editable - Great for Back to School Night, Open House, and Meet the Teacher Night!:

I fell in love with these.  And they are Free!!     {It doesn't take much to make me swoon.}

Here are mine....


I am going to give these out to my students and parents on Meet the Teacher night.  

If I had a homeroom {and not 92+ 3rd grades}  I would laminate a set of these and put a magnet on the back.  Parents can put them on their refrigerator and never lose the teacher contact info. 


Student Savvy has a matching Open House Teacher Bundle for $4.99 and a Meet the Teacher Pamphlet for $2.50.  I wish I had seen these before I typed up and print my STEM info letters.


Hope


1

Back to School Night with Google Forms

Hello Google Forms
So as much as I hate to admit it, summer is creeping to an end and before we know it Back to School and Meet the Teacher nights will be upon us {insert screaming/crying/cover my face emojis, summer goes by too quickly!} My motto for this year comes from a dear college professor and advisor who always told me to, "Work Smarter, not Harder", thanks Dr. A! I decided that I need some serious organization in my life and google forms was/is the answer to my teacher prayers and dreams. I saw this idea on Pinterest {we should get PD credit for all of the time we spend researching educational things on there!} and I decided that my Back to School/Meet the Teacher night was going to be as paperless and organized as I could get it! In previous years, I have been left with tons of student information papers, transportation forms, and have always felt a little overwhelmed, especially when I try to organize them and keep up with them ALL year long. So, this post is dedicated to the Why {stated above}, the How & the Technicals of using Google Forms for collecting student information.

How I plan to Do this
 I plan to have several iPad stations set up in my classroom with a QR code or two that links directly to the Google Form. Each station will have two QR codes labeled "Student Information" and "Transportation Information". Parents/Guardians will have access to iPads at each station or they can use their personal device to scan each QR code and complete the simple and quick forms that I have created.


Creating a Google Form
I have to be honest, I thought creating a Google Form would be a lot harder than it actually is. I have access to Google through my school district and the Google Forms App was in my Apps menu. You create a form with a few simple steps and link it to a Google Sheets (just like an excel) and all of your data will be collected and organized there. When you create your form you have to option to change the background picture at the top, as well as the color of the form, which is pretty great for those of us who like things to look cute and match.

Technicals
I found this out by trial and error, when creating a Google Form, make sure you edit who can respond. For example, originally mine was set to only users in my districts network, but I un-checked that option so that my parents would have access without signing into Google.
I also allowed more than one response per user (so parents of twins, siblings, grandma who brings both kids can complete the form more than once). I also gave the option of editing after a response, I mean I am the worlds' worst at making simple mistakes, so I made these forms user friendly.

The Forms 
As I mentioned before, I created two forms. One for student information and the other for transportation information


I hope this has been helpful! If you have any questions about how to create a google form, please feel free to comment below, send an email, or tweet me!

 Now to enjoy the remainder of summer and not spend the rest of my life savings on the darn cute things at Target/Marshall's... #teacherprobs
@wigington2nd -- teachlikeadiva@gmail.com


Syd
2

copyright © . all rights reserved. designed by Color and Code

grid layout coding by helpblogger.com